Introduction
Factory Namespace Manager (FNM) is a tool that addresses a critical data governance challenge in the manufacturing industry: the standardization of factory data naming conventions. In many manufacturing environments, data is generated from a wide variety of sensors, machines, and systems, each with its own naming schema. This lack of standardization can lead to significant difficulties in managing and integrating data across different sources.
FNM solves this problem by using AI to map the multitude of factory data naming schemas into unified corporate-standard namespaces or data dictionaries. This process enables manufacturers to integrate factory data with enterprise data systems, facilitating end-to-end optimization and improving overall operational efficiency. By creating a unified namespace, the tool helps ensure that data from different sources can be easily understood, analyzed, and utilized for decision-making.
In partnership with Microsoft, Sight Machine has developed Factory Namespace Manager, a small language model specifically for manufacturing, using a fine-tuned version of Phi-3.5 SLM. Factory Namespace Manager is among the first partner-enabled adapted AI models for manufacturing available in the Microsoft Azure AI Foundry model catalog.
.png)
Before you Start
Licensing the Tool
Before you can use Factory Namespace Manager, you need to acquire a subscription. You can purchase a 1-month or 1-year subscription by navigating to this page on the Azure Marketplace. We also offer a one-time 7-day trial which can be subscribed to by clicking the corresponding "Get it Now" button.
The key difference between a "normal" subscription and the "trial" version is:
- “Normal” users have unlimited usage of the model during the license period.
- "Trial" users have limitations on their account, such as limits to the number of tags that can renamed at one time and the total number of tags which can be renamed in a day. This is useful for evaluating the benefits of the tool.
If you’re not sure what option is best for you, reach out and we can help you decide. The subscription type will not affect account set up or how you use the tool.
After you complete the subscription process, a representative will reach out to provide you with next steps. Once a licensing agreement is in place, you will be sent instructions for logging in to the FNM website.
Using the Tool
UI and Page Navigation
Upon logging in, you should see a mostly grey screen with some text and then a “tool bar” at the top. From there you can update your password, or hit the “FNM” button and you’ll be brought to the tool's main interface.
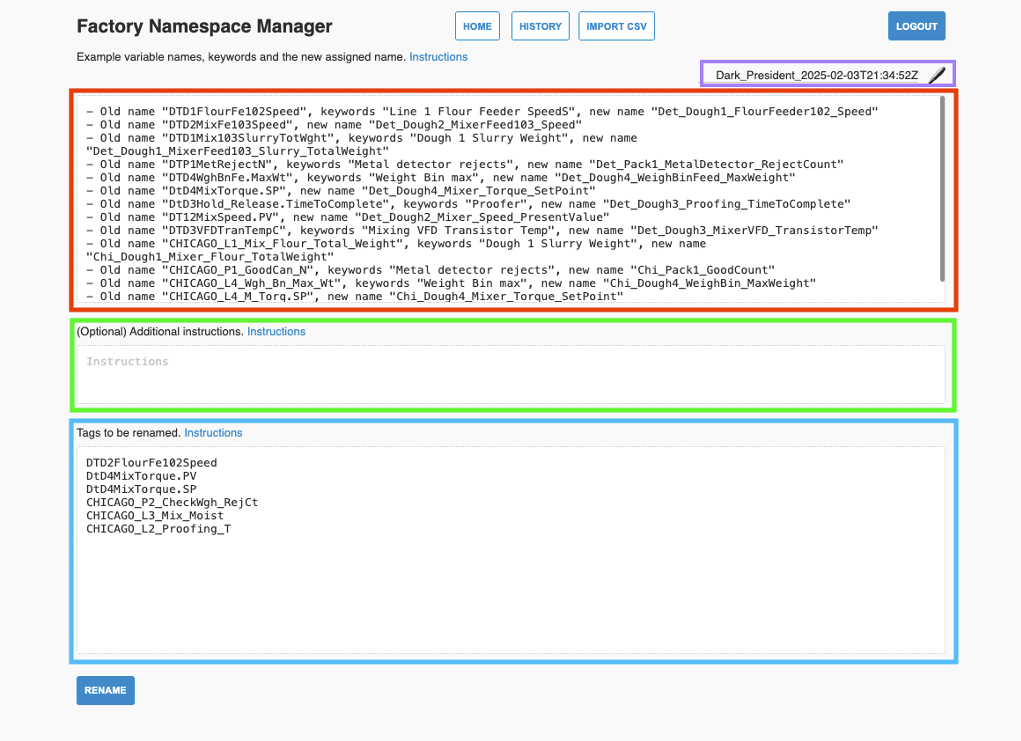
Note: The colored boxes aren’t a part of the UI. They are just being used here to identify key user inputs.
There are 4 buttons at the top of this screen. HOME, HISTORY, IMPORT CSV and LOGOUT
- HOME and LOGOUT are straightforward. HOME will take you to the initial gray screen where you can change your password, LOGOUT will log you out.
- INPUT CSV is one option you can use for importing data to the tool. This will be discussed further below in the Inputting Data section
- HISTORY (indicated by the Purple Box)
- The Red, Green and Blue box essentially make up the info included in the history. It records the inputs of the “run” but not the outputs. Sort of like a version control/history, but this way we can avoid recording all the outputs since those will be larger files and it’s an iterative process.
- This will be automatically updated, but if you want better descriptions or identifiers for your runs, you can also edit directly by clicking the pen icon near the top right of the page.
The red, green and blue boxes contain data/information that will be fed into the model. The contents, function and formatting of the boxes vary slightly.
- Example Variable Names: The training data (Red Box)
- 1-to-1 mappings of legacy to standardized tag names.
- This can be entered manually via the text box (Indicated by the red box) or you can upload a CSV file via the IMPORT CSV button.
- Formatting details will be discussed in more depth further down in this document.
- Example: Old Name “BlowMolder_MoldTemperature_C_Detroit”, New Name “BlwMld_MoldTemp_C_DET”
- Additional Instructions: Naming Scheme “Hints” (Green Box)
- This section is optional when using the tool
- Example: Look Up Tables for abbreviations (i.e. Inverters → INV, Circuit Breaker → BRK)
- Example: Specific Schema Rules (i.e. “Tags that follow the new standard must include a 4-letter Machine ID at the end of the updated name” OR “New names should not exceed 20 characters”)
- Tags to be renamed: The target data set (Blue Box)
- History “ID” (indicated by the Purple Box)
- The Red, Green and Blue box essentially make up the info included in the history. It records the inputs of the “run” but not the outputs. Sort of like a version control/history, but this way we can avoid recording all the outputs since those will be larger files and it’s an iterative process.
- This will be automatically updated, but if you want better descriptions or identifiers for your runs, you can also edit directly by clicking the pen icon near the top right of the page.
Inputting Data
The Red and Blue boxes can be typed in manually, but the easier option will likely be using the IMPORT CSV button. This will populate those boxes based on the csv files (the Green box AKA Additional Instructions will need to be filled out manually)
IMPORT CSV
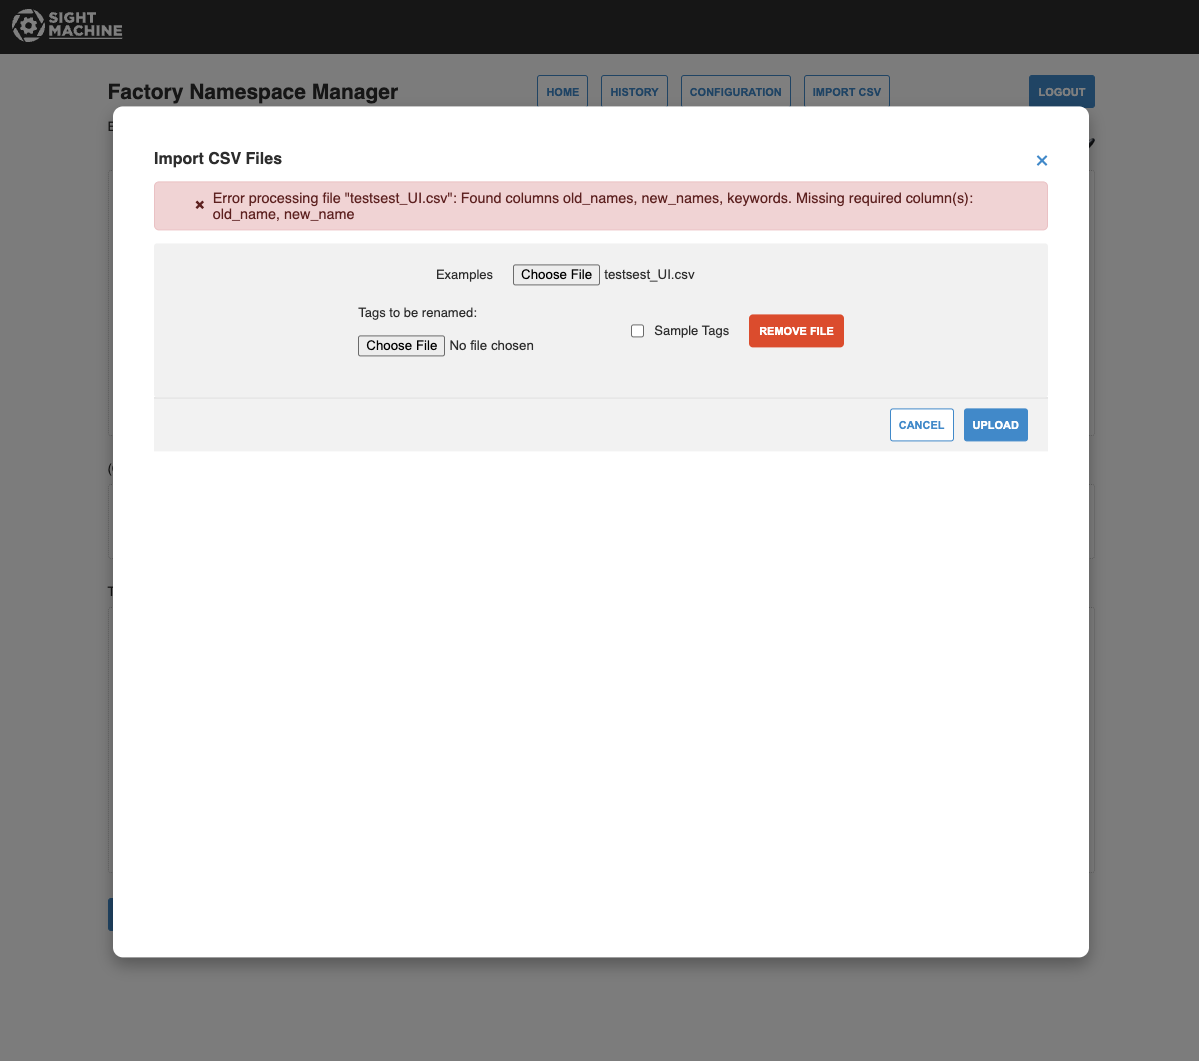
There are some formatting requirements to the csv files like one tag per row and how the columns need to be named. The tool will let you know if there’s a format problem and how to fix it via an error message at the top (Included in picture below)
- "Examples” File: A CSV file with the training examples. These are the tags that have been manually renamed to the target mapping and will be used by the model. This file can include three columns (2 required): old_name, new_name and keywords. Keywords are basically the metadata of the tag and are optional but might provide the model extra context so it can make a more informed decision.
- Example: Let’s say your new tags need to include a reference to the line number of the asset, but your legacy names don’t include the line number. You could add a keywords column to your data which provides the line number (i.e. Old Name “BlowMolder_Temperature_Setpoint_Celcius”, keywords “Line 10”, New Name “L10_BlwMld_Temp_SP_degC”
- Example: Let’s say you are trying to align multiple facilities but each facility has varied rules for their legacy names. You could include the facility name in the keywords so Factory Namespace Manager can pick up on those patterns faster.
- Note: Keywords and the “Additional Instructions" section might sound similar, and they are in a lot of ways. They are both extra information that you can give to the model which can help with its performance. But the key difference is that keywords are metadata related to individual tags, while "Additional Instructions" is metadata relevant to all tags.
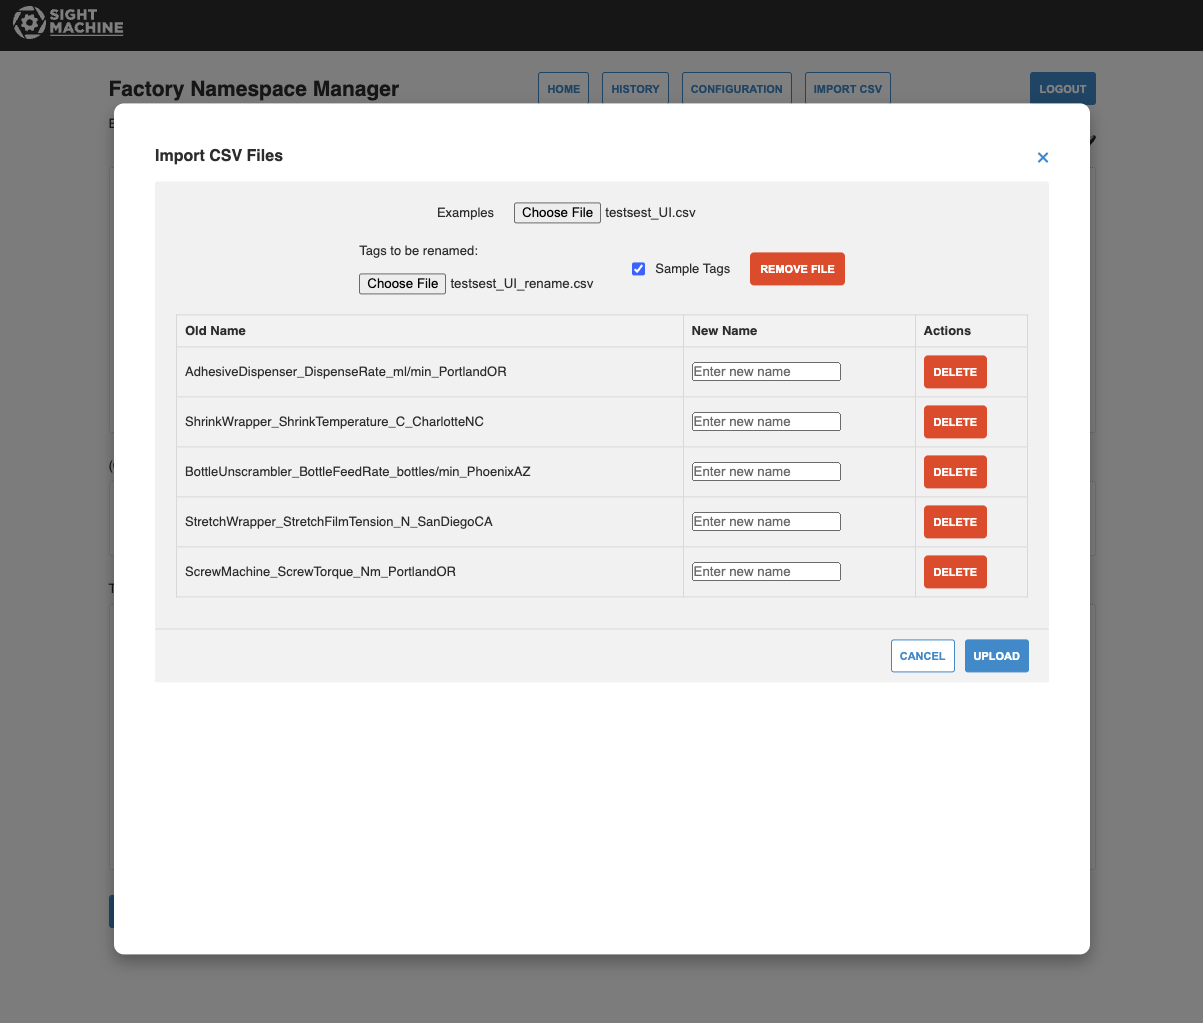
- “Tags to be renamed” File: The target dataset. Similar to above, keywords are optional, but you must include at least the “Old Name”
- The application will then give you the option to fill out or rename an additional handful of tags (picture below). This can be useful if the model is struggling with certain tags and you want to give it targeted data to learn from. The “Sample Tags” button will attempt to “intelligently” pick out useful examples. But you can also skip filling out extra tags by simply hitting the delete button for each tag.
Generating Results
Once you have your files formatted correctly (and additional instructions filled out if you have them), just hit “Upload” then “Rename” and you should get your renamed tags with the option to “Export to Sight Machine” or “Export to CSV”
.png)
If the performance of the model on your new tags is less than expected, you can also try providing more training examples or keywords if available. If issues persist, reach out to your Sight Machine representative or support@sightmachine.com.