Workspace Manager
- Print
- DarkLight
Workspace Manager
- Print
- DarkLight
Article summary
Did you find this summary helpful?
Thank you for your feedback
Overview
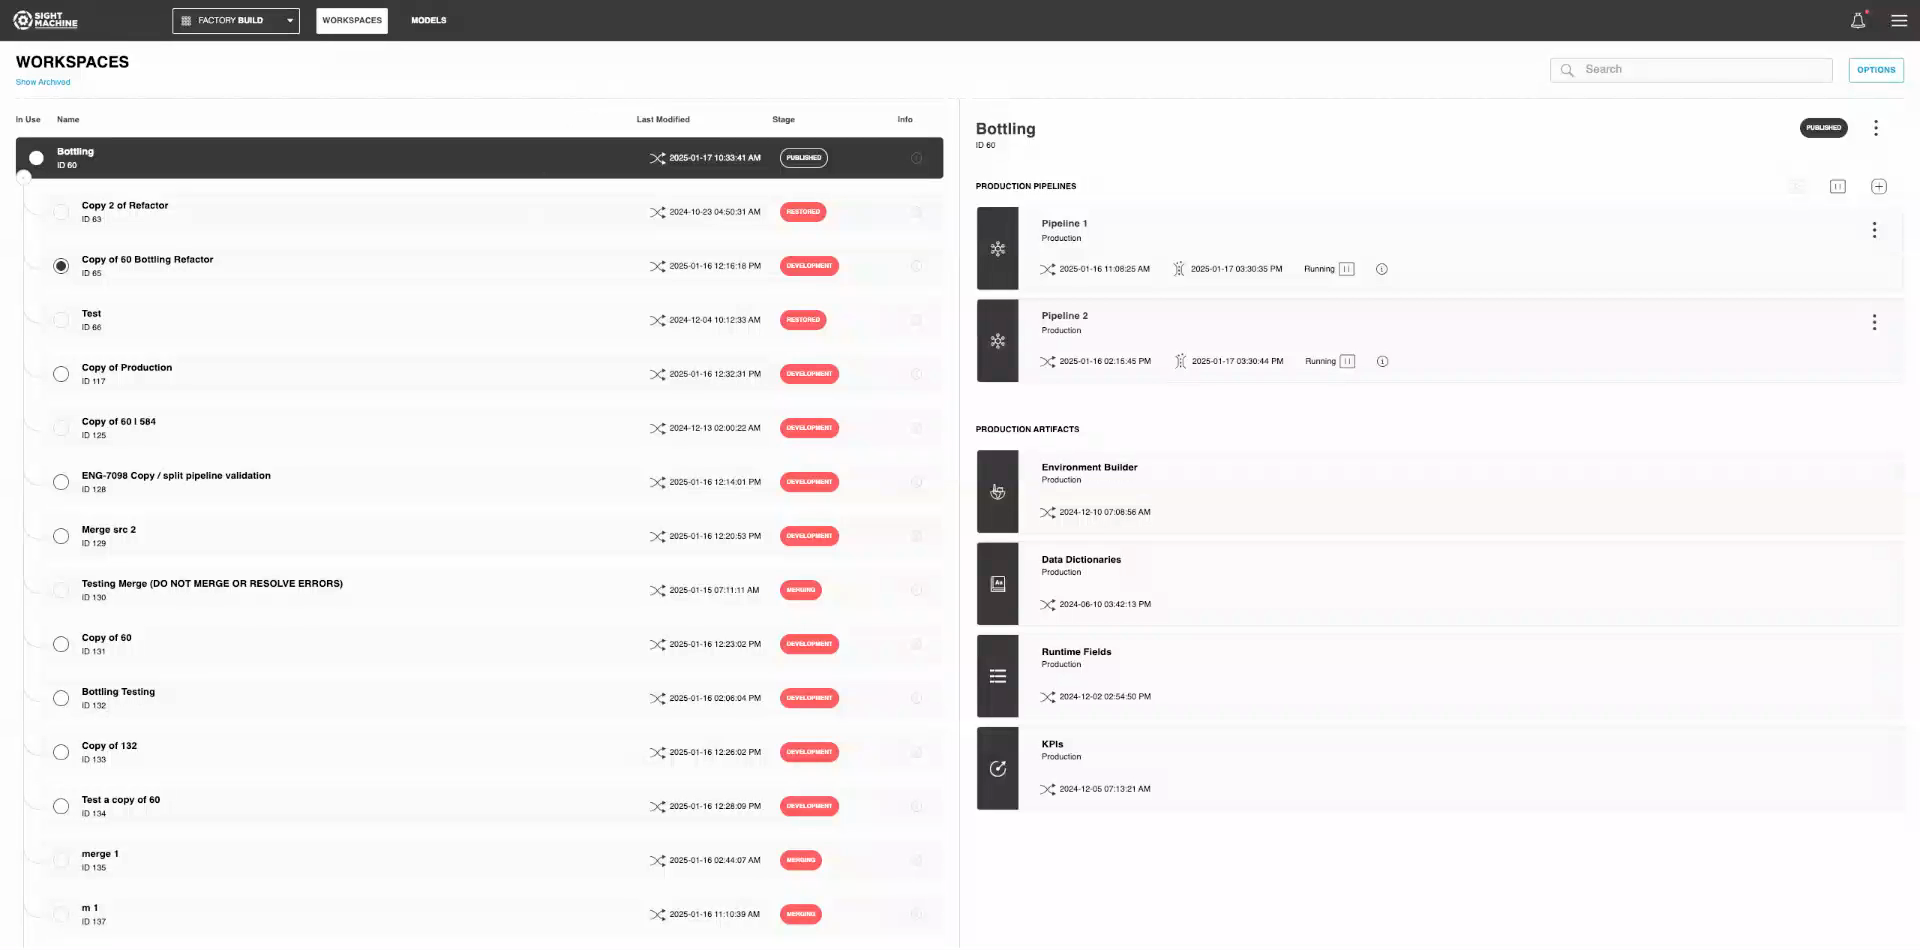
The new workspace manager features a split-screen structure, enabling efficient navigation and management of workspaces:
Left Panel: Displays a comprehensive list of available workspaces.
Right Panel: Provides a detailed view of pipelines and artifacts associated with the selected workspace.
Navigation & Search
Workspaces
Organization
Workspaces are categorized into groups, with the "Production Workspace" always pinned at the top for easy access.
Action for group management:
Expand: Click the '+' button to reveal all workspaces within a group.
Collapse: Click the '-' button to hide the group.
.png)
Details
Workspaces are organized chronologically by their creation timestamp. Each workspace card includes:
In-Use
Name
ID
Last modified time (and user who made last change by hovering over)
Stage
Notes (by hovering over the info icon)
.png)
Selection
Click on a workspace to display its details and navigate easily between workspaces.
.png)
Workspaces with at least one deployed pipeline can be selected to be "In-Use." If no pipelines are deployed, the workspace cannot be set as in-use, and you will be able to see a hover message indicating this reason.
.png)
Pipelines and Artifacts
Organization
Workspace details are divided:
Pipelines Section (Top): Lists all available pipelines.
Artifacts Section (Bottom): Displays artifacts comprehensively.
.png)
Details
Pipelines: Information includes last modified time, modifying user, "processed data until" timestamp, and statuses indicating stages such as running, paused, or draft-only.
Artifacts: Presents modification times and users, affecting components like Environment Builder, Data Dictionaries, Runtime Fields, and KPIs.
.png)
Selection
Click on a pipeline to navigate to that pipeline canvas, or artifact to navigate to each corresponding page for that workspace.
.png)
Search
The Workspace Manager's search function streamlines finding workspaces by name:
Results dynamically filter the left panel, showing matching workspaces.
.png)
If a search query doesn’t match any workspace, an informative empty state appears.
.png)
A currently selected workspace that doesn't fit the search criteria will be automatically deselected during the search.
.png)
Canceling the search reverts to the last selected workspace, provided it wasn't changed during searching.
.png)
.png)
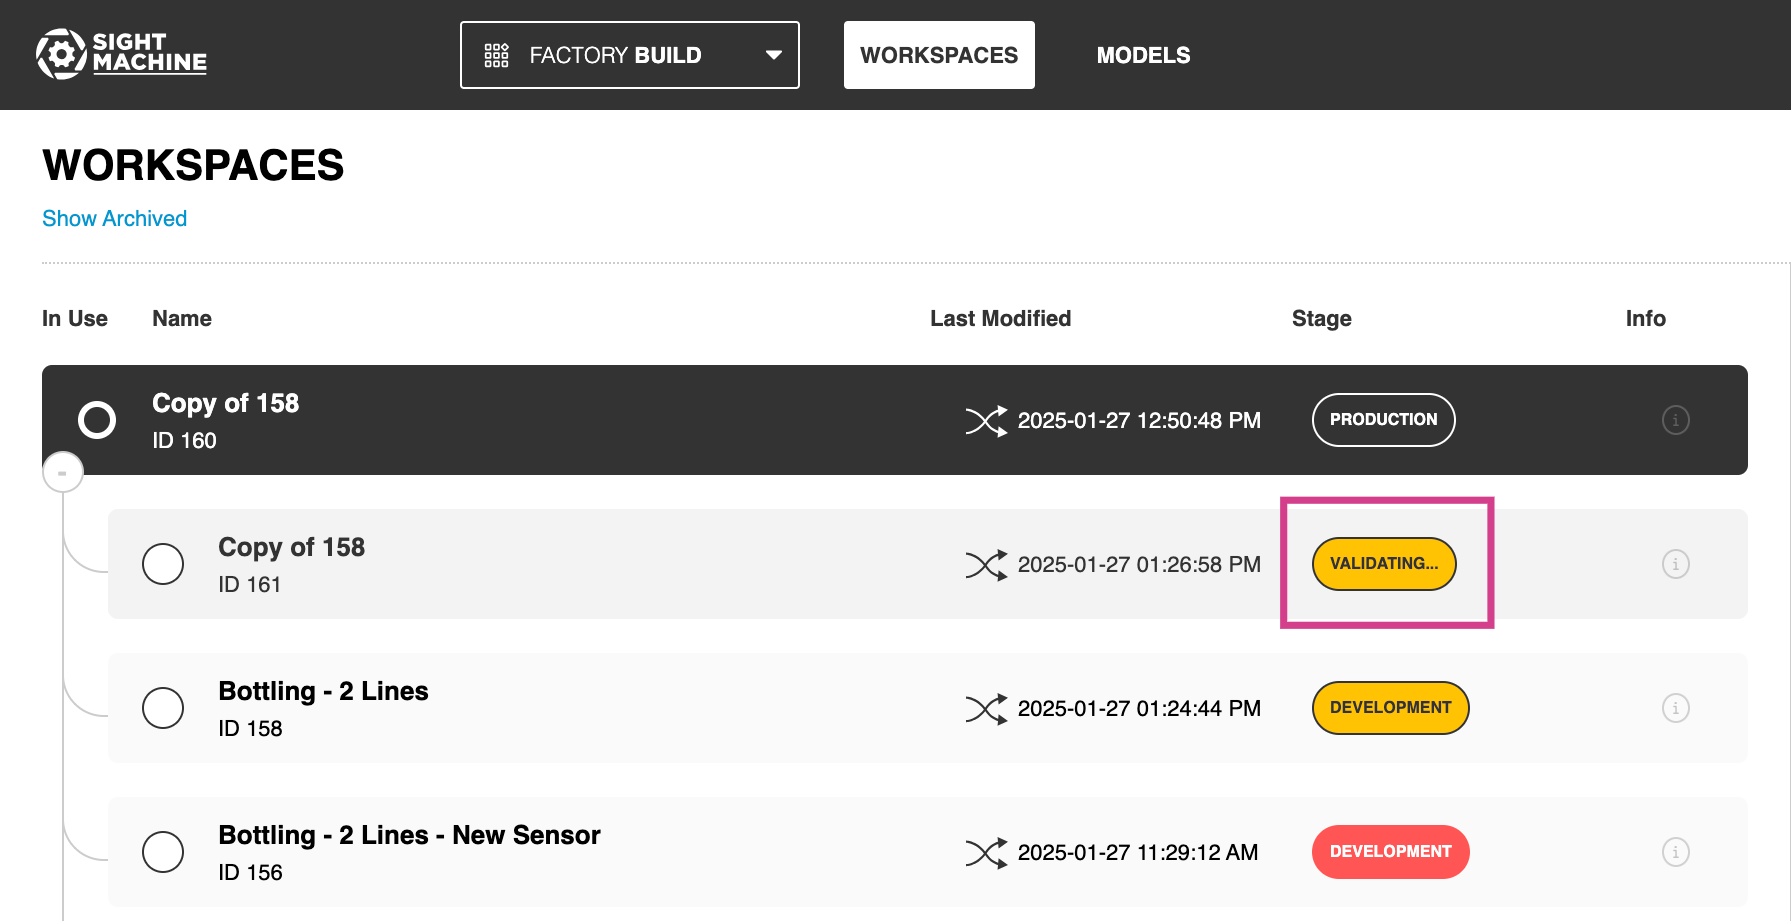
Validation
Validation runs every time the page loads or when changes are introduced to a workspace. During validation, a "validating" message will appear in the pill for the workspace stage, as well as for each pipeline and artifact, until the validation process is completed.
Status
After validation, every workspace can be in one of these 3 states:
Red: Indicates one or more errors across all pipelines and artifacts.
Yellow: Indicates that the workspace has been modified, with one or more changes across all pipelines and artifacts, when compared to the top-level workspace in the group
Black: Indicates that the workspace has not been modified and is identical to the group workspace, including all pipelines and artifacts.
.png)
Hierarchy
Workspaces can have pipelines and artifacts in all three states (Red, Yellow, Black). The priority hierarchy for displaying colors is as follows:
Red: Displayed if there are any errors.
Yellow: Displayed if there are changes but no errors.
Black: Displayed if there are no changes or errors.
This hierarchy ensures that critical issues are prioritized visually for quick identification and resolution.
.png)
Archived Workspaces
This feature allows you to clean up your workspace list by moving workspaces that are no longer needed to an archive. Archiving workspaces is ideal for managing resources efficiently, as it removes unnecessary clutter and reduces additional costs. This ensures that active and relevant workspaces stay visible, while archived ones remain easily accessible yet hidden from the default view for better organization.
View
Archived workspaces are hidden by default. Use the top left button to toggle the visibility of archived workspaces:
Show Archived: Click the "Show Archived" button at the top of the workspace list. This reveals all archived workspaces, and they are presented along with the active ones.
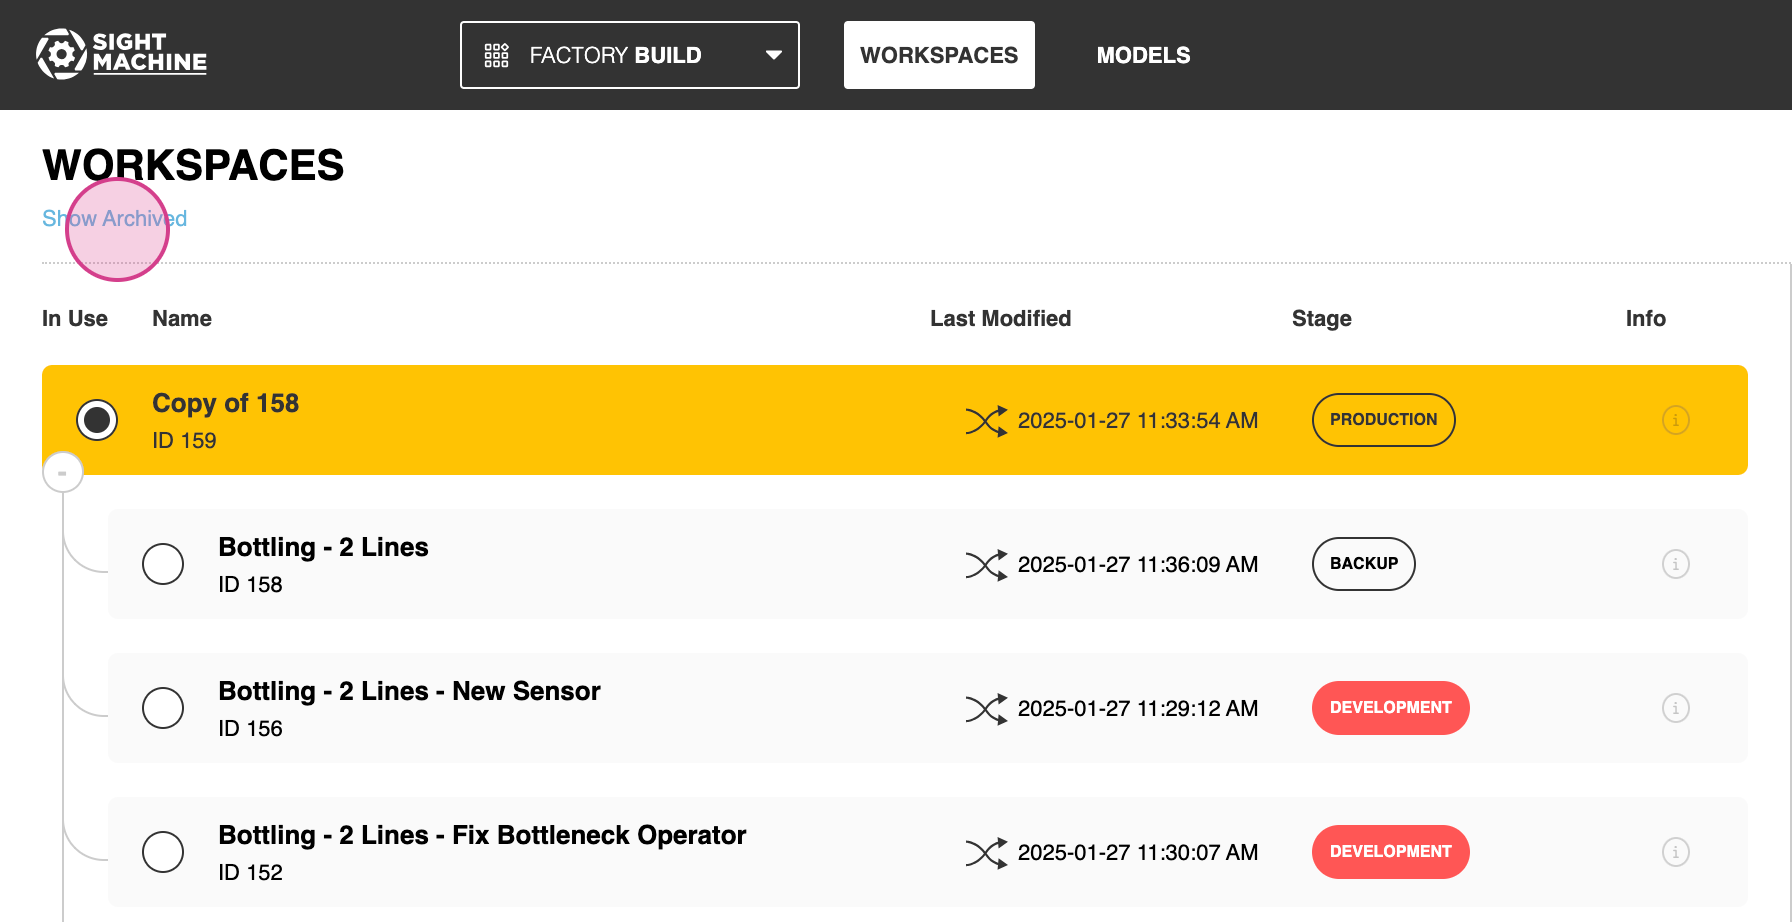
Hide Archived: Click the "Hide Archived" button to hide the archived workspaces and return to the default view.
.png)
Archived workspaces have a distinctive blue color to help you distinguish them from active workspaces.
Organization
Archived workspaces are sorted by their creation date and are displayed within the context of the group workspace they belonged to before being archived.
.png)
For group workspaces, they are also sorted by creation date and organized relative to other group workspaces, with the exception of production workspace, that’s always on the top.
.png)
Details
Archived workspace details are identical to active ones and include:
Name
ID
Last Modified Time
Notes
Stage
Additionally, you can view all pipelines and artifacts that were part of the workspace when it was active.
Please note:
Pipelines and artifacts in archived workspaces are not accessible.
.png)
Archive
Archiving a workspace is straightforward and ensures that it is not deleted but simply hidden from the active list:
Locate the Workspace:
Scroll through the active workspace list to find the workspace you wish to archive.
.png)
Archive the Workspace:
Click the three-dot menu ("...") on the workspace card.
.png)
Select “Management", and then “Archive” from the dropdown menu.
.png)
.png)
An alert will appear, requiring confirmation to prevent accidental actions.
.png)
Upon confirmation, the workspace will immediately move to the "Archived Workspaces" list.
.png)
Please note:
Any workspace and group workspace, except the production workspace, can be archived.
There are no restrictions based on pipeline status. This means that you can archive a workspace or group workspace or even if it has running pipelines.
Restore
Restoring a workspace is straightforward and ensures that you can reactivate an archived workspace from the archive list:
Locate the Workspace:
Scroll through the archived workspace list to find the workspace you wish to restore.
Restore the Workspace:
Click the three-dot menu ("...") on the workspace card.
Select "Management," and then "Restore" from the dropdown menu.
An alert will appear, requiring confirmation before restoring the workspace.
Upon confirmation, the workspace will immediately move to the "Active Workspaces" list.
Please note:
Restoring a workspace will not reactivate any deployed pipelines or processed data that was present in the workspace when it was archived.
Restored workspaces are automatically marked as "Restored," but this status can be modified if needed.
Workspace Actions
This article will guide you through the process of managing workspace actions, including creating, copying, uploading, downloading, and renaming workspaces.
Create New Workspace
Create a new group workspace, providing a clean slate for data and pipeline setup.
Click on the "Options" button on the top right corner
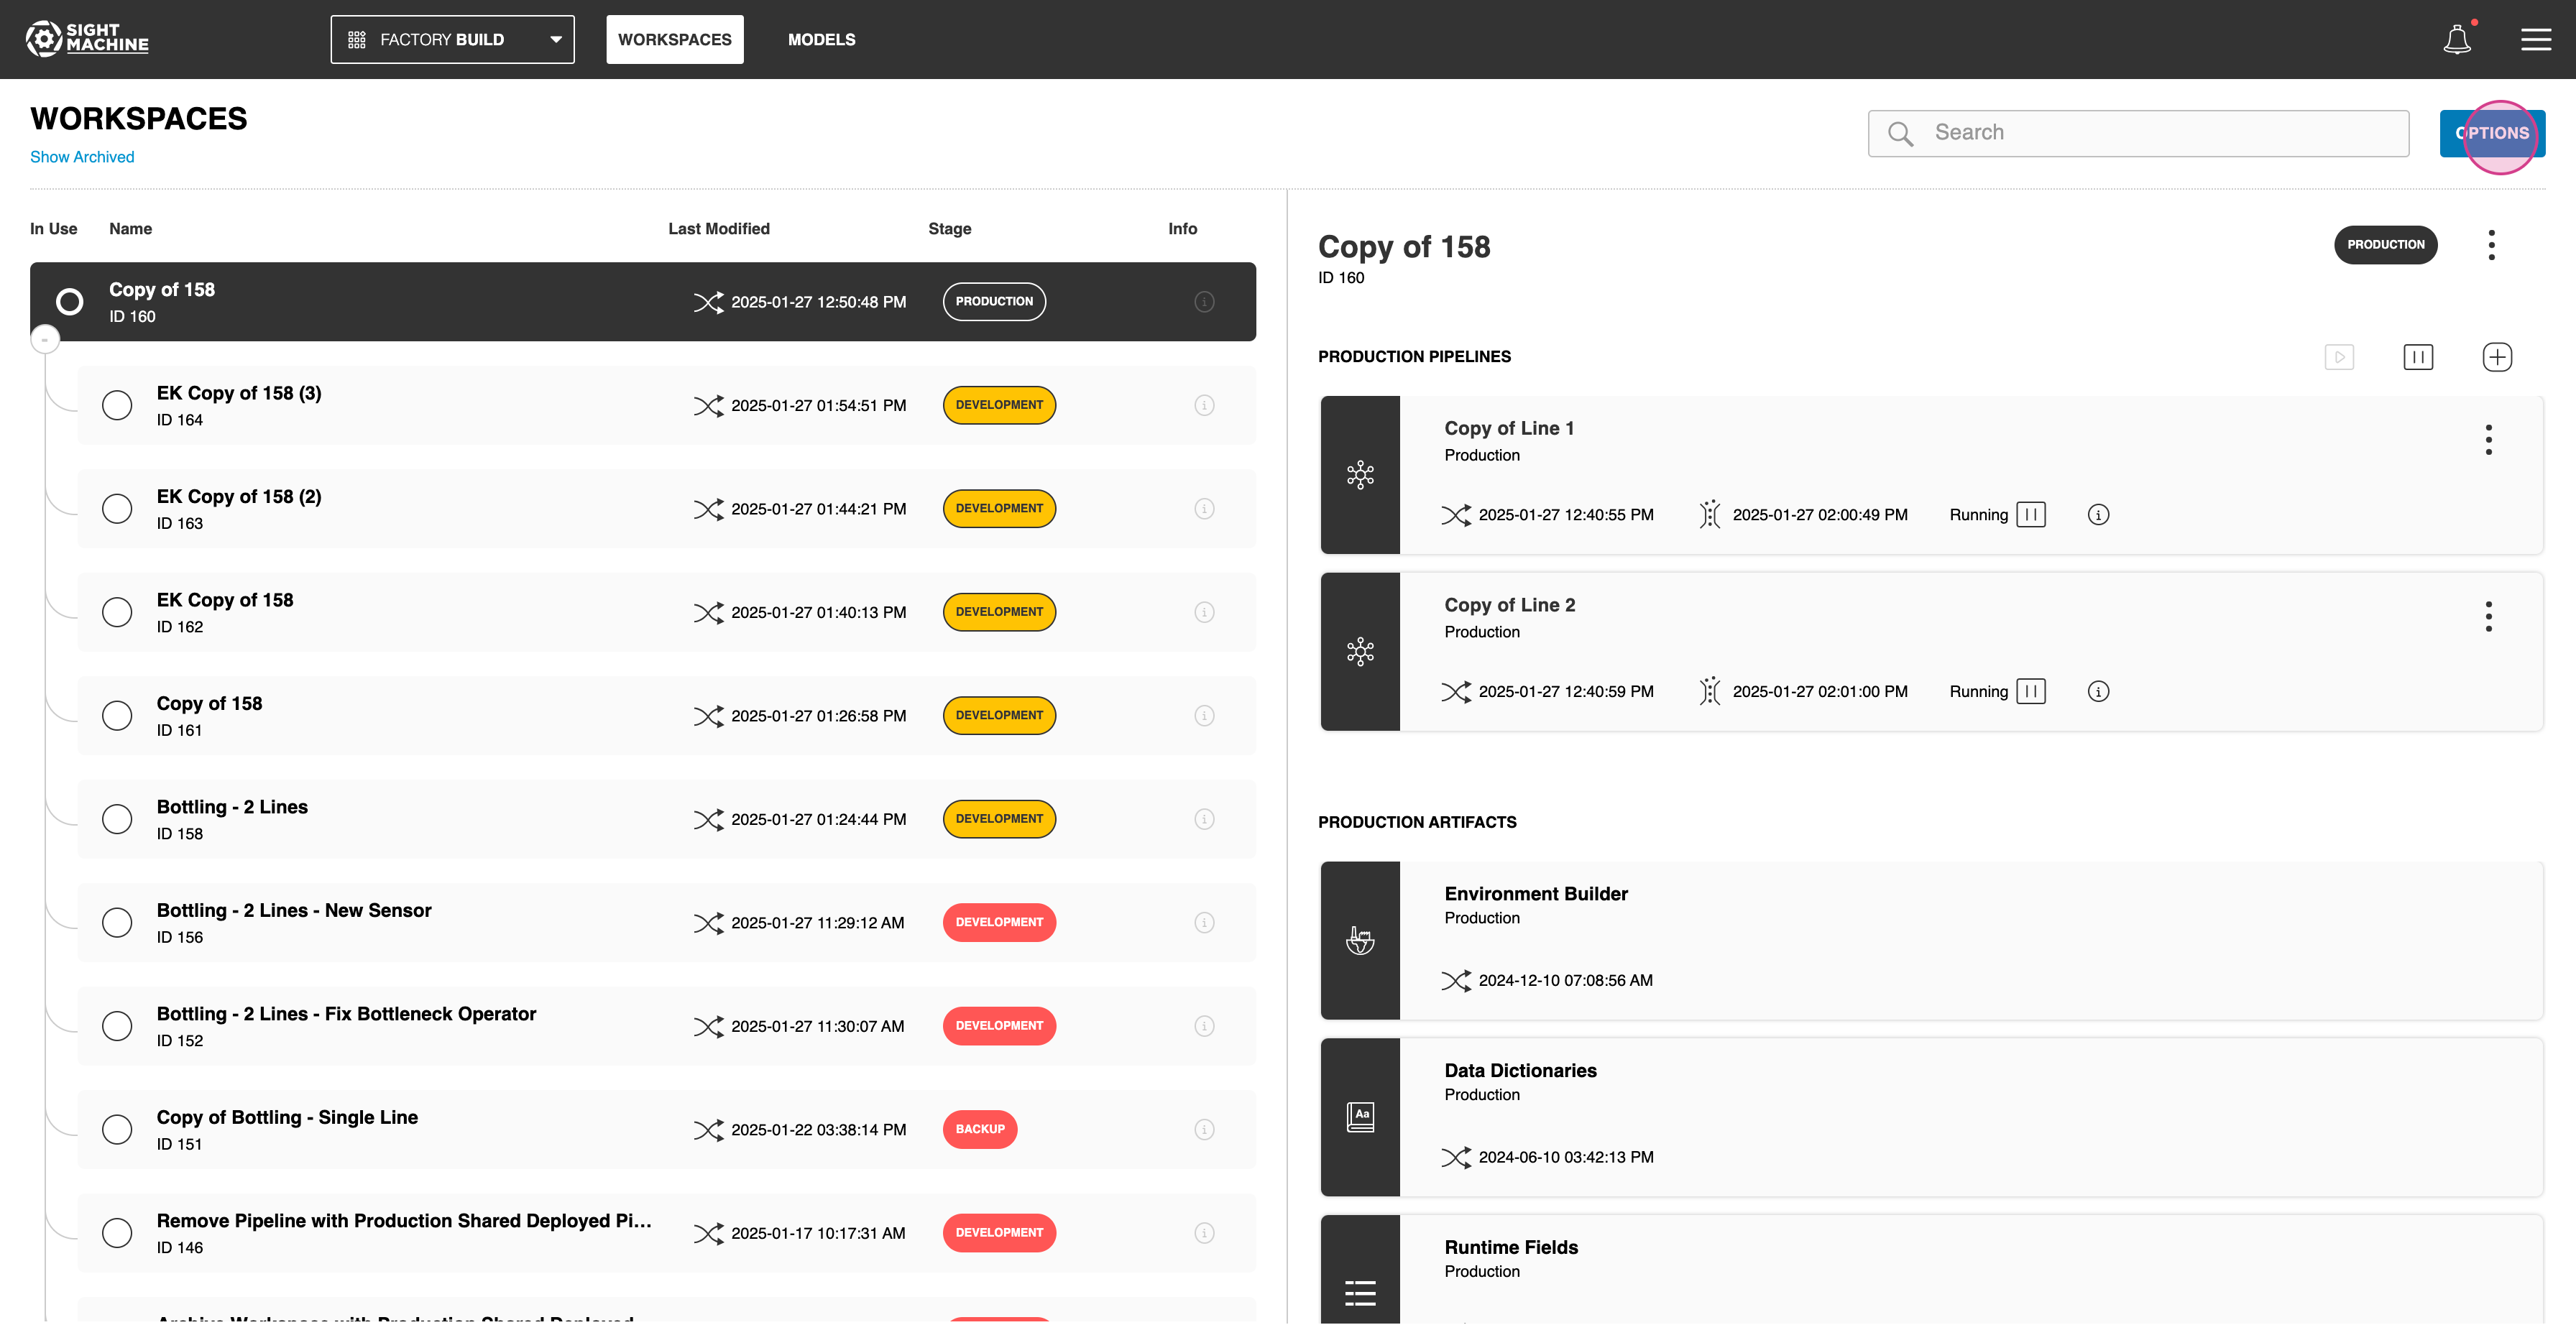
Click on "Create New Workspace"
.png)
Provide a new name for your new group workspace
.png)
Click on "Create Workspace" button to complete your action
.png)
Your new group workspace will appear below the Production workspace group
.png)
Rename a Workspace
Update the name of a workspace for clarity and better organization.
Select the workspace you want to rename
.png)
Change the name, and then press "Return" on your keyboard to finalize the action
.png)
Workspace Actions
Copy
Duplicate an existing workspace within a group. This includes sharing all deployed pipelines, allowing for rapid development and adaptation of existing setups.
Select the workspace you want to copy
.png)
Access the overflow menu for the workspace
.png)
Navigate to the Actions menu, select Copy
.png)
Choose a name for the new workspace
.png)
Finally, click the "Create Workspace" button to complete the creation of a copy.
.png)
.png)
Compare
Analyze differences between two workspaces, including pipelines and artifacts
Go to Actions and select "Compare."
.png)
Select the workspaces you want to compare
.png)
Merge
Merge two workspaces directly without having to go through Compare first.
Go to Actions and select "Merge."
.png)
Choose the two workspaces you want to merge, and Add a name for the new workspace that will be created
.png)
Set as Production
Set a workspace as the new production workspace, thus replacing the existing one.
Go to the workspace you want to set as Production.
Select "Set as Production" from the Actions menu.
Confirm the action within the modal
Workspace Details
Notes
Edit or review notes for a workspace
Access Notes via Details menu
.png)
The Notes section is now separate from other detail information
.png)
Lineage
Trace the data lineage between workspaces
Access Lineage via the Details section
.png)
The Lineage section is displayed independently.
.png)
Revision History
View past changes made to the workspace to track progress and identify discrepancies.
Access the Revision History via the Details menu.
Error Report
Review detailed error reports to identify and address issues affecting workspace functionality.
Access the Error Report from the Details menu.
Workspace Management
Download
Download a workspace configuration to your local device.
Go to Management and then Download
The workspace will be automatically download in your local device
.png)
Upload
Upload a workspace configuration to restore or replicate a workspace
Navigate to the Management menu and select "Upload."
Choose the configuration file from your device and upload it.
Archive
Move the workspace to the archive to declutter the active workspace list.
Select the workspace you wish to archive.
Access the Actions menu and select "Archive."
Archive Workspace
Move the top-level group workspace to the archive to declutter the active workspace list.
Select the group workspace you wish to archive.
Access the Actions menu and select "Archive Workspace"
Restore
Bring an archived workspace back into the active list without modifying its previous configuration.
Navigate to the Archived Workspaces section.
Select the workspace you wish to restore and choose "Restore."
Delete
Permanently remove a workspace. This action is irreversible, but can only be performed on Archived workspaces
Select the archived workspace you want to delete.
Access the Actions menu and select "Delete."
Confirm the action in the prompt to finalize deletion.
Pipelines Actions
Create New Pipeline
Select the workspace where you want to create a new pipeline.
Click on the plus button to add new pipeline

Provide a name for your new pipeline and click on create your pipeline.
.png)
.png)
Your new pipeline will appear within your workspace, underneath any existing pipelines.
.png)
Rename a Pipeline
Select the name of the pipeline you want to rename
.png)
Change the name, and press return on your keyboard to finalize the action.
.png)
Pipeline Operations
Note that all pipeline operations require deploy pipeline to be used.
Run / Pause
Select the deployed pipeline you want to run/pause
There are 3 ways to run/pause a deployed pipeline
First way - Click on the overflow menu of the deployed pipeline you want to run/pause, and then click on Run or Pause
.png)
.png)
.png)
Second way - Run/pause the pipeline directly from the button within the card.
.png)
.png)
Third way - You can run/pause all the pipelines within the workspace clicking the respective buttons on the top right corner for the Pipeline section
.png)
.png)
.png)
.png)
Pipeline Actions
Copy a Pipeline
Select the pipeline you want to copy
Click on the overflow menu
.png)
Click on Actions
.png)
Click on Copy
.png)
Provide a name for your copy, and click Create Pipeline to finalize your action
.png)
Note that this creates a copy of the pipeline, but only copies the drafts and not the deployed version of that pipeline.
Download a Pipeline
Click on the overflow menu
.png)
Click on Actions
.png)
Click on Download
.png)
A JSON file with the pipeline configuration will be automatically downloaded into your local device
Upload a Pipeline
.png)
.png)
.png)
.png)
You'll be asked to provide a new name for the pipeline. The new uploaded pipeline will replace the existing one.
.png)
Remove a Pipeline
Go to Actions, click Remove, and you'll be able to remove a pipeline
.png)
.png)
Pipeline Details
Notes
You'll find notes for the pipeline along with data processing information by going into overflow menu, click on Detail and then Notes
.png)
.png)
Revision History
You'll find Revision History by going into overflow menu, click on Details and then Revision History
.png)
.png)
Revision History now includes multiple pipelines as well
